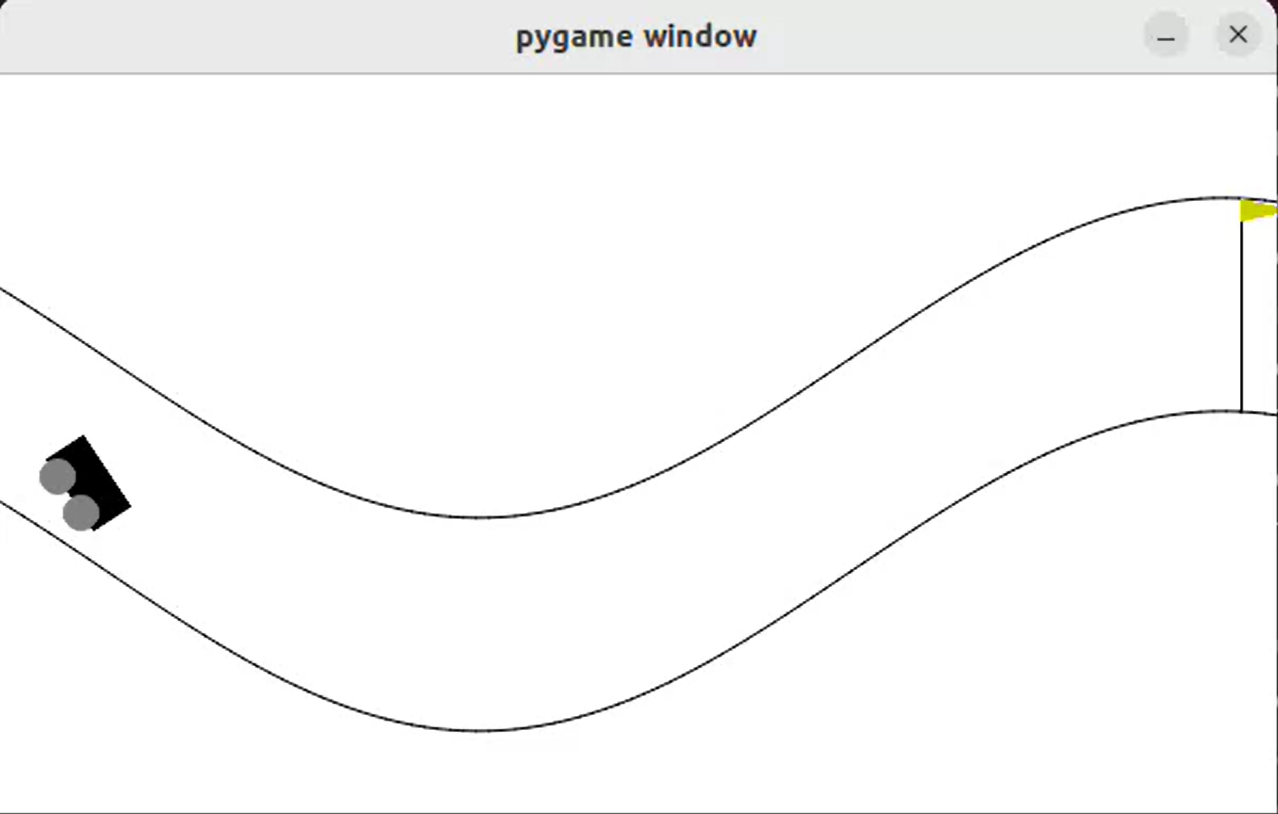
gym에서 기본으로 주어지는 Mountain Car Continuous 환경을 조금 변형하여 원하는 환경을 만드는 연습을 하려고 한다. 이 학습의 목표는 구부러진 하나의 길에서 자동차가 길에 충돌하지 않고, 시작 지점에서 도착지점까지 무사히 도달하는 것으로 한다. 실행하는 것은 비슷하기 때문에 환경을 만드는 것에 집중하면 된다.
환경 class를 만드는 데 핵심 요소는 init, step, reset 3가지 함수이다. 전체 코드는 마지막에 있다.
Init
init에서는 환경에서 사용할 변수들을 선언해주고, 매 step 실행할 수 있는 action의 범위와, state의 범위를 설정해준다. 이때, 어느 환경이던지 핵심적인 부분은 state, action_space, observation_space 이 3가지이다. (observation은 state와 같은 의미로 사용되는 것 같다)
- action_space : 매 step 실행되는 action의 범위를 지정한다.
- observation_space : 이 환경의 state가 있을 수 있는 범위를 지정한다.
- state : 이 환경의 현재 상태가 저장된다. 매 step이 state가 update 된다.
action_space와 observation_space은 다음과 같이 spaces라는 라이브러리로 선언해주어야 한다.
self.action_space = spaces.Box(
            np.array([self.min_action, self.min_action]),
            np.array([self.max_action, self.max_action])
            , dtype=np.float32
)

self.observation_space = spaces.Box(
            np.array([self.min_position_x, self.min_position_y, -self.max_speed, -self.max_speed]),
            np.array([self.max_position_x, self.max_position_y, self.max_speed, self.max_speed]),
            dtype=np.float32
)
step 함수에서 state(observation)이 정해진 범위 밖으로 가지 않도록 제한을 두는데, 왜 observation_space이 필요한지에 대해서 찾아봤지만 아직 알지 못했다. 그냥 안전장치 개념으로 이해하고 코드를 작성해도, 잘 작동하는 것을 보면 지금 당장은 이렇게 이해하고 넘어가도 크게 문제되지 않을 것 같다.
Step
step 함수는 action을 받아서 이 action에 따라 state를 update하고, 동작에 따라 reward를 계산하는 역할을 한다. 또한 잘 사용하지 않는 info를 제외하면 4가지 값을 return한다.
- state : action따라 update된 state
- reward : 현재 step에서 계산된 reward
- terminated : 진행중인 에피소드가 현재 step에 의해 종료되었는지. 종료되었으면 True
- truncated : 진행중인 에피소드가 현재 step에 의해 중단되었는지. 중단되었으면 True
step 내부의 코드는 환경마다 매우 다르지만, action을 받고 state를 계산하고, 4가지 값을 return하는 것은 큰 틀은 같다.
Reset
reset 함수는 에피소드가 종료되거나 중단되었을 때 처리해야 할 것들을 모아놓은 함수이다. 보통 값을 처음으로 초기화하는 역할을 한다. 초기화된 state와 info를 return한다.
전체 코드
gym에서 제공하는 예제 Mountain Car Continuous를 조금 변형하여 작성한 환경 코드이다. 실행 코드도 밑에 있다.
import math
from typing import Optional
import numpy as np
import gymnasium as gym
from gymnasium import spaces
from gymnasium.envs.classic_control import utils
from gymnasium.error import DependencyNotInstalled


collision_reward = -20

X = 0
Y = 1
POS_X = 0
POS_Y = 1
VEL_X = 2
VEL_Y = 3

class Continuous_Env(gym.Env):
    metadata = {
        "render_modes": ["human", "rgb_array"],
        "render_fps": 30,
    }

    def __init__(self, render_mode: Optional[str] = None):

        # 최대, 최소 힘
        self.min_action = -1.0
        self.max_action = 1.0

        # position_y의 범위는 x값에 의해 구해지는 track에서의 값이므로 따로 지정할 필요 없음
        # track은 x=xs일때, y = [0.5*np.sin(3 * xs) * 0.45 + 0.5 , 0.5*np.sin(3 * xs) * 0.45 + 0.8] 사이의 공간임
        # x의 범위는 -1.2 ~ 0.6
        self.min_position_x = -1.2
        self.max_position_x = 0.6
        self.min_position_y = -0.5*0.45 + 0.5
        self.max_position_y = 0.5*0.45 + 0.8
        self.goal_position  = 0.55

        # 속력의 최대 값
        self.max_speed = 0.07

        self.power = 0.0015

        # self.state 지정해주기
        # self.state = np.array([position_x, position_y, velocity_x, velocity_y], dtype=np.float32)
        self.state = np.array([-1.2, 0.65, 0.0, 0.0], dtype=np.float32)

        self.screen_width = 600
        self.screen_height = 400
        self.screen = None
        self.clock = None
        self.isopen = True

        # action이 작용할 수 있는 범위 설정
        # [x힘, y힘]
        self.action_space = spaces.Box(
            np.array([self.min_action, self.min_action]),
            np.array([self.max_action, self.max_action])
            , dtype=np.float32
        )

        # state가 있을 수 있는 범위 설정
        # [x위치, y위치, x속도, y속도]
        self.observation_space = spaces.Box(
            np.array([self.min_position_x, self.min_position_y, -self.max_speed, -self.max_speed]),
            np.array([self.max_position_x, self.max_position_y, self.max_speed, self.max_speed]),
            dtype=np.float32
        )

    def step(self, action: np.ndarray):
        position = np.array([self.state[POS_X],self.state[POS_Y]]) # x,y position 값이 들어있는 1차원 배열임 -> 기존 code 바꿔줘야함
        velocity = np.array([self.state[VEL_X],self.state[VEL_Y]]) # x,y 속도 값이 들어있는 1차원 배열임 -> 기존 code 바꿔줘야 함

        # 이번 step에 실행하려는 action(힘)이 min,max 밖의 값이라면 min이나 max 값으로 바꿔줌.
        force = doNormalize(action, self.max_action)

        # gym 예제에서 미리 정한 속도 식
        # 원래 code에서는 1차원 force만 주어지고 sin 곡선 위를 움직이므로 cos가 곱해졌지만
        # 2차원에서 x,y축 힘을 다 주면 이는 고려할 필요없다.
        # Ft = p에 의해 힘에 미리 정한 값 곱하면 속도 변화량이다.
        velocity[X] += force[X]* self.power
        velocity[Y] += force[Y]* self.power

        # 현재 힘을 가해서 변한 속도가 속도 범위 외의 값이면 조정해줌
        velocity = doNormalize(velocity, self.max_speed)

        # 구한 속도를 이용해서 position update
        # vt = s 식을 이용한 식인듯, t는 대충 1로 하거나 t도 이미 const 값을 곱해서 v에 반영한듯
        # position이 2차원인 경우 -> x,y를 각각 구함
        # position_x += velocity_x ,  position_y += velocity_y
        position[X] += velocity[X]
        position[Y] += velocity[Y]
        if position[X] >= self.max_position_x:
            position[X] = self.max_position_x
        if position[X] <= self.min_position_x:
            position[X] = self.min_position_x


        # 현재 x에 대해서 track의 y값 bound 최대,최소
        reward = 0
        ybound_botton = self.track_bottom(position[X])
        ybound_top    = self.track_ceiling(position[X])

        terminated = False
        truncated = False

        # 일단 track에 충돌하면 속도가 0이 되고, 음수 reward
        if position[Y] <= ybound_botton:
            position[Y] = ybound_botton
            reward      += collision_reward
            truncated   = True
        elif position[Y] >= ybound_top :
            position[Y] = ybound_top
            reward      += collision_reward
            truncated   = True

        # x값이 왼쪽 끝 track 밖으로 나가려 한다면 속도 0으로 만들어버림
        if position[X] == self.min_position_x and velocity[X] < 0:
            reward      += collision_reward
            truncated  = True

        # goal에 도달했다면 높은 reward 주고 terminate
        # 우리의 예제에서는 그냥 position_x 만 check 하여 넘어 갔는지만 check하면 될듯.
        if (position[X] >= self.goal_position) :
            terminated = True
            reward     += 1000.0

        # 이 step 동안 얼마나 앞으로 가는지 reward
        # 이 reward가 있어야 앞으로 진행하려 함
        reward += velocity[X]*100

        # state 변수를 position과 velocity로 지정.
        # 이 예제에서는 position_x, position_y, velcocity_x, velocity_y로 지정
        self.state = np.array([position[X],position[Y],velocity[X],velocity[Y]], dtype=np.float32)

        if self.render_mode == "human":
            self.render()
        return self.state, reward, terminated, truncated, {}

    def reset(self, *, seed: Optional[int] = None, options: Optional[dict] = None):
        super().reset(seed=seed)

        # 처음으로 실행할 때 위치를 지정하는 code
        self.state = np.array([-1.2, 0.65, 0.0, 0.0], dtype=np.float32)

        if self.render_mode == "human":
            self.render()
        return self.state, {}

    def update_pos(self, pos):
        self.state[POS_X] = pos[0]
        self.state[POS_Y] = pos[1]

    def render_on(self):
        self.render_mode = "human"

    def track_ceiling(self, xpos):
        return (0.5*np.sin(3 * xpos) * 0.45 + 0.8)

    def track_bottom(self,xpos):
        return (0.5*np.sin(3 * xpos) * 0.45 + 0.5)

    def render(self):
        if self.render_mode is None:
            assert self.spec is not None
            gym.logger.warn(
                "You are calling render method without specifying any render mode. "
                "You can specify the render_mode at initialization, "
                f'e.g. gym.make("{self.spec.id}", render_mode="rgb_array")'
            )
            return

        try:
            import pygame
            from pygame import gfxdraw
        except ImportError as e:
            raise DependencyNotInstalled(
                "pygame is not installed, run `pip install gymnasium[classic-control]`"
            ) from e

        if self.screen is None:

            pygame.init()
            if self.render_mode == "human":
                pygame.display.init()
                self.screen = pygame.display.set_mode(
                    (self.screen_width, self.screen_height)
                )
            else:  # mode == "rgb_array":
                self.screen = pygame.Surface((self.screen_width, self.screen_height))
        if self.clock is None:
            self.clock = pygame.time.Clock()

        world_width = self.max_position_x - self.min_position_x
        scale = self.screen_width / world_width
        carwidth = 40
        carheight = 20

        self.surf = pygame.Surface((self.screen_width, self.screen_height))
        self.surf.fill((255, 255, 255))


        # --------------수정 부분 -------------------
        pos_x = self.state[POS_X] # 자동차의 x축 pos
        xs = np.linspace(self.min_position_x, self.max_position_x, 100)
        ys1 = self.track_bottom(xs)
        ys2 = self.track_ceiling(xs)
        xys1 = list(zip((xs - self.min_position_x) * scale, ys1 * scale))
        xys2 = list(zip((xs - self.min_position_x) * scale, ys2 * scale))

        pygame.draw.aalines(self.surf, points=xys1, closed=False, color=(0, 0, 0))
        pygame.draw.aalines(self.surf, points=xys2, closed=False, color=(0, 0, 0))
        clearance = 10
        # ------------------------------------------


        l, r, t, b = -carwidth / 2, carwidth / 2, carheight, 0
        coords = []
        for c in [(l, b), (l, t), (r, t), (r, b)]:
            c = pygame.math.Vector2(c).rotate_rad(math.cos(3 * pos_x))
            coords.append(
                (
                    c[0] + (pos_x - self.min_position_x) * scale,
                    c[1] + clearance + self.state[POS_Y] * scale,
                )
            )

        gfxdraw.aapolygon(self.surf, coords, (0, 0, 0))
        gfxdraw.filled_polygon(self.surf, coords, (0, 0, 0))

        # 바퀴 부분 rendering
        for c in [(carwidth / 4, 0), (-carwidth / 4, 0)]:
            c = pygame.math.Vector2(c).rotate_rad(math.cos(3 * pos_x))
            wheel = (
                int(c[0] + (pos_x - self.min_position_x) * scale),
                int(c[1] + clearance + self.state[POS_Y] * scale),
            )

            gfxdraw.aacircle(
                self.surf, wheel[0], wheel[1], int(carheight / 2.5), (128, 128, 128)
            )
            gfxdraw.filled_circle(
                self.surf, wheel[0], wheel[1], int(carheight / 2.5), (128, 128, 128)
            )

        flagx = int((self.goal_position - self.min_position_x) * scale)
        flagy1 = int(self.track_bottom(self.goal_position) * scale)
        flagy2 = flagy1 + int(0.3*scale)
        gfxdraw.vline(self.surf, flagx, flagy1, flagy2, (0, 0, 0))

        gfxdraw.aapolygon(
            self.surf,
            [(flagx, flagy2), (flagx, flagy2 - 10), (flagx + 25, flagy2 - 5)],
            (204, 204, 0),
        )
        gfxdraw.filled_polygon(
            self.surf,
            [(flagx, flagy2), (flagx, flagy2 - 10), (flagx + 25, flagy2 - 5)],
            (204, 204, 0),
        )

        self.surf = pygame.transform.flip(self.surf, False, True)
        self.screen.blit(self.surf, (0, 0))
        if self.render_mode == "human":
            pygame.event.pump()
            self.clock.tick(self.metadata["render_fps"])
            pygame.display.flip()

        else: # self.render_mode == "rgb_array":
            return np.transpose(
                np.array(pygame.surfarray.pixels3d(self.screen)), axes=(1, 0, 2)
            )

    def close(self):
        if self.screen is not None:
            import pygame

            pygame.display.quit()
            pygame.quit()
            self.isopen = False


def getdet(x,y):
    return (x**2 + y**2)**(1/2)

def doNormalize(vector, max_value):
    det_vector = getdet(vector[0], vector[1])
    normalize_fac = 1.0                         # normalize 값, 초기값은 1.0(그대로)

    # 최대 힘 크기보다 큰 힘이라면 현재 힘을 최대 힘으로 normalize함
    if (det_vector > max_value):
        normalize_fac = max_value / det_vector

    return_vector = [vector[0]*normalize_fac, vector[1]*normalize_fac]  # x축 힘, y축 힘
    return return_vector
실행 코드
위의 환경으로 학습을 실행하기 위한 코드이다. 위 환경 파일을 import 하여야 한다. 학습 코드 부분과, 실행 코드 부분이 나뉘어져 있는데, 실행하고 싶은 부분만 남기고 나머지를 주석처리 해서 실행시켜주어야 한다.
자세히 설명하자면, 실행코드 부분을 주석처리하고, 학습 코드 부분만 실행시켜준다. 학습이 완료되면 마지막에 학습된 정책이 저장된 경로가 출력된다. 이 경로를 복사해서 밑에 실행코드의 checkpoint_path로 할당해준다. 그 후 학습 코드를 주석처리하고 다시 컴파일 해서 실행 코드를 실행하면 된다.
import twoD_car_env as ENV
import gymnasium as gym
from gymnasium import spaces
import ray
from ray import train, tune
from ray.rllib.algorithms import ppo
from ray.tune.registry import register_env
from ray.rllib.algorithms.ppo import PPOConfig
from ray.tune.logger import pretty_print
from ray.rllib.algorithms.algorithm import Algorithm

import time

ray.init()

config = PPOConfig().training(lr=tune.grid_search([0.01, 0.001, 0.0001]))
register_env("my_env", lambda config: ENV.Continuous_Env(config))


############################ 학습 코드 ############################
algo = (
    PPOConfig()
    .rollouts(num_rollout_workers=1)
    .resources(num_gpus=0)
    .environment(env="my_env")
    .build()
)


for i in range(100):
    result = algo.train()
    print(i)
    if i == 99:
        checkpoint_dir = algo.save().checkpoint.path
        print(f"Checkpoint saved in directory {checkpoint_dir}")


############################ 실행 코드 ############################
env = ENV.Continuous_Env()
obs,info = env.reset()

# 저장된 학습 정책 사용
checkpoint_path = "/tmp/tmp145600v0"
algo = Algorithm.from_checkpoint(checkpoint_path)
terminated = False

env.render_on()
env.render()
total_reward =0
while(terminated == False):
    action = algo.compute_single_action(obs)
    obs, reward, terminated, truncated, info = env.step(action)
    total_reward += reward
    if truncated:
        print(total_reward)
        total_reward = 0
        obs ,info = env.reset()
    env.render()
print(total_reward)
env.close()'연구 > 강화학습' 카테고리의 다른 글
| stable baselines 3 사용법 기초 (0) | 2024.04.19 |
|---|---|
| RLlib에서 tensorboard로 결과를 visualize 하는 법 (0) | 2024.02.18 |
| Mountain Car Continuous 환경 (0) | 2024.02.03 |
| RLlib 기초 - 예제 (grid world) (0) | 2024.01.14 |
| RLlib 사용 기초 (2) | 2024.01.13 |